Blog
June 25, 2021
Understanding Apache Maven: Automate Your Builds

Test Automation,
Functional Testing
To effectively implement continuous delivery, it is essential to have tools that automate the building process, i.e translating source code into an executable application. The building process differs from programming language to programming language. Today we are going to learn about Apache Maven builds and how we use them for Java applications.
But first, let’s understand what builds are.
What is a Maven Build?
A Maven build describes the process of translating source code into an executable application using Maven, a build tool used for Java applications. With a tool like Maven, developers can both build and document the application lifecycle framework.
Building software consists of translating the source code into binary codes and then packaging the binary codes into the software. Compiling source code results in codes that are understandable by the machine or the virtual machine, which runs and interprets the binary sources. A build is the only way to ensure that the software works and is doing what is expected from it.
Builds also manage dependencies. What are dependencies? A single application may contain several thousands of lines of codes, or even more. Additionally, the development community offers several frameworks that developers can use, adapt, and customize while developing their applications. These frameworks are referred to in the code and are called dependencies.
Back to topWhy Automate Builds With Maven?
To ensure an optimized building process, it becomes essential to have build tools that automate:
- Dependencies download and management: dependencies management has long been a nightmare, since different modules and plugins may bring along a different version of the same dependency, resulting in conflict. When dependencies are managed manually, it becomes hard to exclude the dependencies that bring the conflict. It can also be time-consuming to make sure that every dependency that the application needs to run is present at the right stage.
- Source code compilation: translating source code into binary code can be tricky, especially when the application is evolving and contains more and more lines. Every class is compiled into bytecode and is packaged into a .class file. Compiling hundreds or thousands of classes one by one is not efficient.
- Assembly of the binary codes into packages: the purpose of building software is to have a whole: a jar, a war or else. Once the source code is compiled, the bytecodes are packaged (grouped) into a single package.
- Test execution: Best practices advocate the use of the Test Driven Development approach. However, the more lines the developers write, the more tests they will have to write and execute as well. Without automation, testing can become a bottleneck.
- Deployment of the application
Maven and Other Build Tools
Build tools allow automation of the build process and allow frequent validation of the software product and multiple changes before each release. The most popular build tools are:
Apache Maven is a tool that allows building applications written in Java. In Java, the source code is compiled to bytecode before the JVM can interpret it, code compilation is part of the build process, and the output of the build process leads to an executable application.
Why Choose Maven?
You may still doubt the choice to use Maven to build an executable application. For a small project that consists of a few classes with a few thousand lines, it may still be conceivable to build manually or to use tools such as Ant. However, for projects of a large scale, which is very often the case of an application developed in Java, the volume of codes is quite large, and so are the dependencies.
Maven allows you to manage dependencies smoothly and resolve conflicts resulting from introduced dependencies very quickly. Maven allows each project to define the dependencies it uses as well as the versions used.
Dependency management transitivity is another reason to choose Maven; it gives the necessary tools to manage dependency management complexity. Maven also provides a quick overview of the dependencies, making it easy to check whether dependencies don’t overlap or are incompatible. This is a nice feature in an integrated development environment. With this overview, exclusion becomes easier.
While code reusability has undeniable advantages, dependency management is not the only advantage Maven offers. Maven also makes the integration of other useful tools easier. In the end, we will see some examples of plugins and tools that are often used with Maven.
Back to topGetting Started with Maven
A Maven project is a project that is developed to be built using Apache Maven. It consists of files and folders. These files and folders are named and placed in a specific location to enable Maven to build the project. Maven projects require only a few commands to construct the application.
It is easy to start a maven project; you only need to download Maven and install it on your workstation. You can choose to do a hard installation or download a portable version and configure your classpath. You can also see how to install Maven according to your OS.
Once you are done with the installation, you can start using the Maven command line. To make sure everything is installed properly, you can open your terminal and enter mvn, if Maven is not configured correctly, you will see: “command not found”.
Setting a Maven POM Configuration
To start a Maven project, we need to start a Project Object Model (POM) configuration. The configuration consists of an XML file that defines the project, and handles dependencies or performs the plugin configuration for the software build. Build tools encourage modularity and reusability of codes, so POM is also used to define the relationship between each module.
This XML file is placed at the root folder of each project or each module, it is named pom.xml and is as follows.
<project>
    <modelVersion>4.0.0modelVersion>
    <groupId>com.blazemetergroupId>
    <artifactId>blazemeter-exampleartifactId>
    <packaging>jarpackaging>
    <version>1.0-SNAPSHOTversion>
    <name>com.blazemeter.examplename>
    <url>http://maven.apache.org
    <dependencies>
        <dependency>
            <groupId>org.springframeworkgroupId>
            <artifactId> spring-coreartifactId>
            <version>5.0.7.RELEASEversion>
            <scope>compilescope>
        dependency>
    dependencies>
    <build>
        //...
    build>
project>
In the dependencies section, we declare the module or project dependency. Dependencies are every module, framework, project, and application the current project needs and uses. Maven uses a central repository, whether it is a central repository an organization has on its server or the default Maven central repository. With the use of a Central repository, the developers don’t have to store every dependency they need locally.
In this section, we also declare the scope.
- scope: The scope of the dependency defines when this dependency is needed and indicates if the declared dependency should be part of the runtime package. This allows using the dependency only when needed. Sometimes, software is packaged with dependencies that are not used during runtime, dependencies required only during test phase for instance. Defining the scope will help reduce the size of the final product and will make the execution of each phase and the packaging faster. Maven provides six scopes: compile, provided, runtime, test, system, and import. You can read more about the dependency scope.
<dependency>
    <groupId>org.springframeworkgroupId>
    <artifactId>spring-coreartifactId>
    <version>5.0.7.RELEASEversion>
dependency>
Make sure you define the right scope when declaring dependencies. Dependency scope is important while configuring a Maven project. The scope defines the moment when a given dependency is required. Not all dependencies are required at compile time: there are dependencies that are required during the test phase, while some are only required at runtime. Not dealing correctly with dependency scope can lead to a large executable file, more time to run each phase and an application that takes time to be launched.
Starting a Maven Project
Let’s assemble the bricks to understand how to use and create a Maven project. There are two essential steps when you want to start a Maven project: the first one is the project configuration that consists of creating and editing the POM file, the second is the setting up of the project structure.
The two steps are complementary. The structure allows Maven to build the project correctly while the configuration enables Maven to know how to build the project.
These steps can be summarized as follows:
- Create a folder that will be the root directory of the project. This is where the maven command will be executed.
- Create the POM file in the folder created at step 1, see the XML file previously defined.
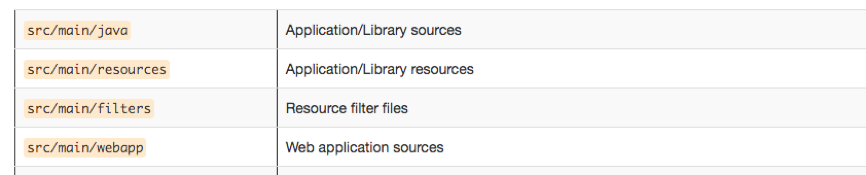
- Create the project tree by following the model.
The application codes will be located in the main folders:
How to Build Your Application with Maven
To build your application, you only have to open the terminal and go to the project or module directory, which is the directory where the pom file is. From there you can execute the lifecycle you want.
Maven comes with a few commands that allow developers to manage the lifecycle of their Maven project; Maven refers to these commands as the phases of the Maven build lifecycle. There are six different phases defined by Maven: compile, test, validate, package, install, deploy. Each phase will only perform the validation it is defined for. For instance, the test phase will download all dependencies needed during the test phase and run tests, but will not do the packaging.
Note: Anytime you need to execute a maven command, you will need to go to the project root directory. This means that the maven command is executed in the directory where the pom file is. It is possible to run a lifecycle on a project module or at the project level. In this case, the lifecycle is executed for all the modules.
Let’s have a quick look at the six different phases of the Maven build lifecycle:
1. Compile
Launched with the command mvn compile. If this phase is executed, the source code is compiled.
2. Test
To run this phase, we can run the command line: mvn test, this command will launch the unit test placed at src/test/java folder. It will use the resources placed at src/test/resources if there are any resources specified in this folder. Compiling the code is required before running test. However, it is not necessary to launch the compile phase before this phase, all required steps to launch the test will be done automatically by Maven.
3. Validate
The command mvn validate enables us to validate that the POM is correctly formed according to model version definition.
4. Package
Run by invoking the command mvn package. This phase makes sure to group the compiled code in the specified distributable format (jar, war, etc.). The packaged code is placed in the target folder.
5. Install
Rnning mvn install in the command line installs the packaged project into the local repository. That way, it can be used by other projects.
6. Deploy
The command mvn deploy is similar to install; only it puts the final package on the shared repository so that any developers that have access to that common repository can use the packaged code.
Back to topAutomating Maven Builds
It is possible to automate maven builds. So, instead of executing the required maven command lines manually, we can decide to run them automatically every time it is needed. We can, for instance, use a continuous integration environment to run build automation. To do so, we can configure this build automation on a CI tool like Jenkins and execute the required lifecycle every time there is a change in the code or at a fixed time.
Check out the full installation instruction for Jenkins on Windows. Once you are done with the installation, configure your Jenkins job.
Back to topMaven Extended Use for Maximum DevOps Capability
Maven presents many useful capabilities. In this section, we are going to see a few best practices and recommendations to use Maven better and to ensure DevOps capability.
1. IDE Integration
So far, we have seen how to create a Maven project by editing its POM manually and how to execute the Maven lifecycle phase. Using Maven from an IDE is more convenient and develops an application faster.
Plugging into an IDE can automate the use of Maven, so it is not necessary to reinvent the wheel each time. An IDE will already build the project skeleton with all necessary files in just a few clicks, with a minimal default configuration.
You just need to configure your files. Without an IDE, you will have to create each configuration file manually, one by one, and make sure you have the right structure (a valid XML according to a specific schema). Moreover, many IDEs have a Maven plugin. An IDE offers auto-completion as well, which makes it easy to know what should be included in the configuration file.
2. Plugin Integration
One of DevOps best practices is using automation tools. Maven has lots of useful plugins that can be integrated into the Maven project. These plugins allow us to run tools like code analysis tools automatically.
Here are few plugins I recommend:
- SonarQube to analyze the quality of codes to make sure the delivered product maintains a high code standard.
- Cobertura to measure test coverage
- FindBugs for issue tracking.
Bottom Line
Build tools are essential when it comes to building software, and it is even more critical if we aim at continuous integration and continuous delivery. The build is the only way to ensure that the software product is behaving the way it is intended. A Maven build is a great option that presents many benefits.
Running Performance Tests with BlazeMeter
After automatically building your tests, make sure you also have performance tests in your continuous integration flow. Performance tests ensure that every time you add code, your system stays stable and nothing has broken. They are also important before expected traffic spikes, like before Black Friday (if you’re an ecommerce site).