Blog
July 6, 2021
NUnit is an important framework. In this blog, we break down the basics of NUnit, including how to use NUnit annotations.
What Is NUnit?
NUnit is a test Framework like JUnit. You can use NUnit to define your tests cases, tests suites and assertions. NUnit can run all the tests and show you a report. NUnit, like JUnit, enables test-driven development. You can also run your NUnit tests in Taurus.
If you have a new project that uses .NET programming languages and you want to add unit tests, you can use open source NUnit.
Back to topWhy Use NUnit?
Here are the top seven reasons to use NUnit.
- NUnit runs very well with .NET programming languages.
- It is open source and it is free.
- It is easy to integrate it with testing projects.
- NUnit works with many integrated runners including Resharper and TestDriven .NET.
- NUnit has frequent version updates.
- NUnit has a graphical user interface.
- Very easy integration with Visual Studio and other IDEs.
How to Use NUnit
Now let’s learn how to use NUnit.
1. Download the Framework
First, download the NUnit Framework. You can use various installation approaches.
- NUnit install via NuGet (If you are using Visual Studio). This is the preferred way. Use the other ways if you don’t have an internet connection
- Zip file download from NUnit
- Combined Approach
2. Write Your Tests
After downloading, it’s now time to write your tests. You can write them on your local machine or in the cloud.
3. Use NUnit Annotations
NUnit is basically composed of attributes, or annotations. These indicate to the framework to execute the tests that are implemented in the class, and also how to interpret them. Annotations tell the framework how to interpret the code. After this code is compiled, a dll file is generated that can be executed through a console or using the graphic interface. Tests also include assertions that allow checking and comparing values.
Back to top
Top NUnit Annotations to Use
Now let’s take a look at the annotations and how to use them. The annotations are very easy to use: just add the annotation between brackets before the method declaration. With the annotation you can define the test: behavior (specifying Setup or TearDown method), assertions for example performance assertions like MaxTime method, and information like the Category method.
Annotation | Usage |
Category | Specifies one or more categories for the test |
Culture | Specifies cultures for which a test or fixture should be run |
Indicates | Indicates that a test should be skipped unless explicitly run |
Ignore | Indicates that a test shouldn't be run for some reason |
MaxTime | Specifies the maximum time in milliseconds for a test case to succeed |
OneTimeSetUp | Identifies methods to be called once prior to any child tests |
OneTimeTearDown | Identifies methods to be called once after all child tests |
Platform | Specifies platforms for which a test or fixture should be run |
Random | Specifies generation of random values as arguments to a parameterized test |
Repeat | Specifies that the decorated method should be executed multiple times |
Retry | Causes a test to rerun if it fails, up to a maximum number of times |
TearDown | Indicates a method of a TestFixture called immediately after each test method |
Test | Marks a method of a TestFixture that represents a test |
TestCase | Marks a method with parameters as a test and provides inline arguments |
Timeout | Provides a timeout value in milliseconds for test cases |
SetUp | Indicates a method of a TestFixture called immediately before each test method |
Let’s see some examples of the most common annotations
SetUp
We generally use this for code that needs to be executed before executing a test, with the purpose to not repeat the code in each test.
Example:
 [SetUp]
    public void Initialize() {

        //driver = new FirefoxDriver();
        browser = ConfigurationManager.AppSettings["browser"];

        switch (browser)
        {
            case "Chrome":
                driver = new ChromeDriver();
                break;
            case "Firefox":
                driver = new FirefoxDriver();
                break;
        }
        driver.Manage().Window.Maximize();
    }
In this case, every test inherited in the [SetUp] annotation with the Initialize() method will be used to decide which browser to use, to open the test and to maximize the window.
TearDown
This is an annotation that acts the opposite of [SetUp]. It means the code written with this attribute is executed last (after passing other lines of code).
Example:
  [TearDown]
    public void EndTest()
    {
        if (TestContext.CurrentContext.Result.Outcome.Status == NUnit.Framework.Interfaces.TestStatus.Failed) {
            test.Log(LogStatus.Fail, TestContext.CurrentContext.Result.Message);
        }
        if (TestContext.CurrentContext.Result.Outcome.Status == NUnit.Framework.Interfaces.TestStatus.Passed)
        {
            test.Log(LogStatus.Pass, "Test Succesfull. ");
        }

        driver.Close();
        report.EndTest(test);
        report.Flush();
        report.Close();
    }
Here we use [TearDown] annotation to close the browser and create a report of the runned tests. This report can be viewed in a log or in GUI modem and can also be integrated into CI (see further down).
Test
The declaration of the steps that are going to be executed in the test.
Example:
 [Test]
        public void testLogin(string user, string message)
        {
            HomePage objHomePage = new HomePage(driver);
            objHomePage.goToLogin();

            LoginPage objLoginPage = new LoginPage(driver);
            objLoginPage.loginWithUser(user);

            MyAccountPage objAccountPage = new MyAccountPage(driver);
            objAccountPage.waitForLoad();

            Assert.AreEqual(objAccountPage.UserMessage(),message);
        }
This is a simple login method that goes to the login page, sets the user and password in the respective fields, click on the login button and waits for the page to load. After that, it checks if the loaded page is correct with an assertion .
NUnit also provides us with several annotations to parametrize our tests. This functionality can be used with the annotations [TestCase ] and [TestCaseSource]
TestCase
This annotation replaces the annotation Test we saw before, and allows creating a set of tests that execute the same code with different data inputs.
Example:
 [TestCase(“user1”, “Welcome user1”)]
    [TestCase(“user2”, “Invalid User”)]
    [TestCase(“user3”,”Not Registered User”)]

    public void testLogin(string user, string pw){}
In this example we defined that the test testLogin runs 3 times, and in each execution the data input is specified in the annotation of our Test Case.
TestCaseSource
This annotation is similar to the previous one and it’s used when the list of records is too big. It takes a public static property that it provides in every entry record. This allow us to load our record from a .csv file or from a database.
[TestCaseSource("TestCases")]
    public void testLogin(string user, string pw){}
In this case the script testLogin takes as data input every record that is stored in the property TestCases. TestCases method return the data type TestCaseData that can hold any type of data and expected results
Example:
public static List TestCases
{
    get
    {
        var testCases = new List();

        using (var fs = File.OpenRead(@"C:\users.csv"))
        using (var sr = new StreamReader(fs))
        {
            string line = string.Empty;
            while (line != null)
            {
                line = sr.ReadLine();
                if (line != null)
                {
                    string[] split = line.Split(new char[] { ',' },
                        StringSplitOptions.None);

                    string  user= split[0];
                    string  expectedMessage = split[1];

                    var testCase = new TestCaseData(user).Returns(expectedMessage );
                    testCases.Add(testCase);
                }
            }
        }

        return testCases;
    }
}
Example: NUnit Test Results
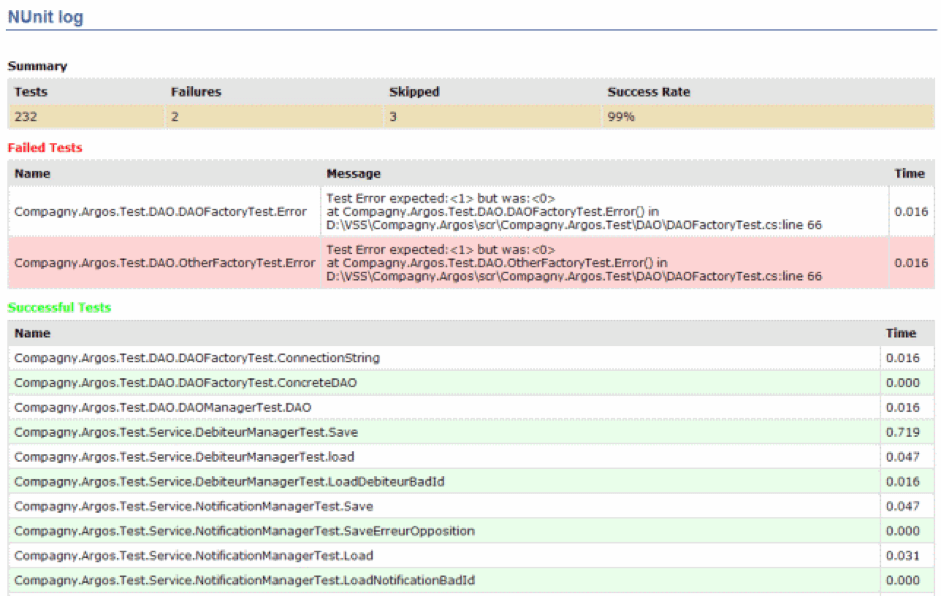
NUnit provides a console mode, the nunit-console, which facilitates its use in the continuous integration process. In the console, the pass-fail results are provided immediately and no subjective human judgments or interpretations of test results are required.
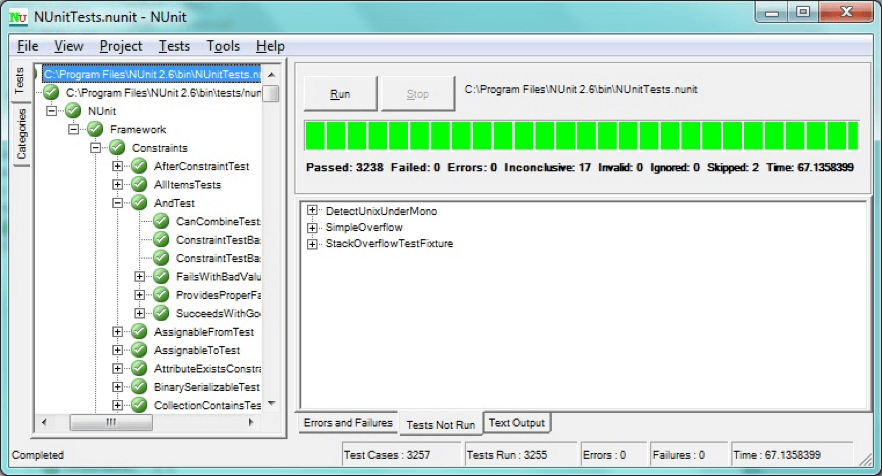
NUnit also has a graphical user interface, similar to the one used in JUnit, which it makes it easy to use for JUnit users. In the GUI you can see the execution of the tests, the test that is running and how many tests succeeded and failed. You can also see the result of each step and each assertion.
Back to top
Get Started With NUnit Annotations and More
After creating your NUnit tests, you can run them in Taurus. Taurus adds additional options to running your tests, like test failure criteria, and also enables connecting your tests to BlazeMeter with the command -cloud. Read more here on Taurus.
Install Taurus and get started today!
This blog was originally published on July 5, 2018 and has since been updated for accuracy and relevance.


