Blog
September 13, 2020
When testing your APIs, web service, or other system parts, you might need to record or retrieve data from a database. The purpose of this interaction is to check the correct record of specific data in the DB or to prepare test data for the tests by adding specific records to the database.
This article will show you how to test a MySQL connection by using Apache JMeter™ in order to check, update, and add entries to your database. Based on these examples, each tester can then perform the appropriate interaction with the database, during their further testing. In this blog post, we will use JMeter 3.2, the database MySQL 5.7.18 Community Edition (free and installed on your PC), and Java8.
📕 Related Resource: Learn more about How to Test BLOB from MySQL
How to Test MySQL Connection With JMeter
There are two steps to testing MySQL connection with JMeter:
Part 1 - Configuring the Database on JMeter
Before you start working with a database by using JMeter, you need to do the following:
- Make sure there is a user who has permission to connect and perform common actions CRUD in the database
- Make sure the database is available for remote or local access
- Install and choose the right properties for JMeter and the Java Development Kit
Installing the Connector/J 5.1.42 Driver for DB Interaction
To interact with the database it is necessary to:
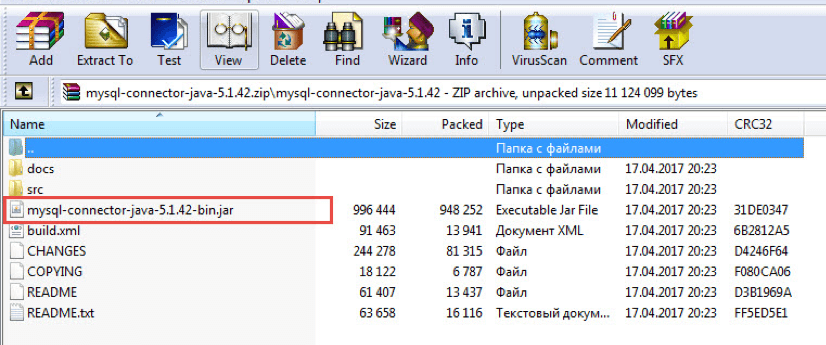
1. Download the Connector/J 5.1.42 driver.
2. Enter the downloaded archive.
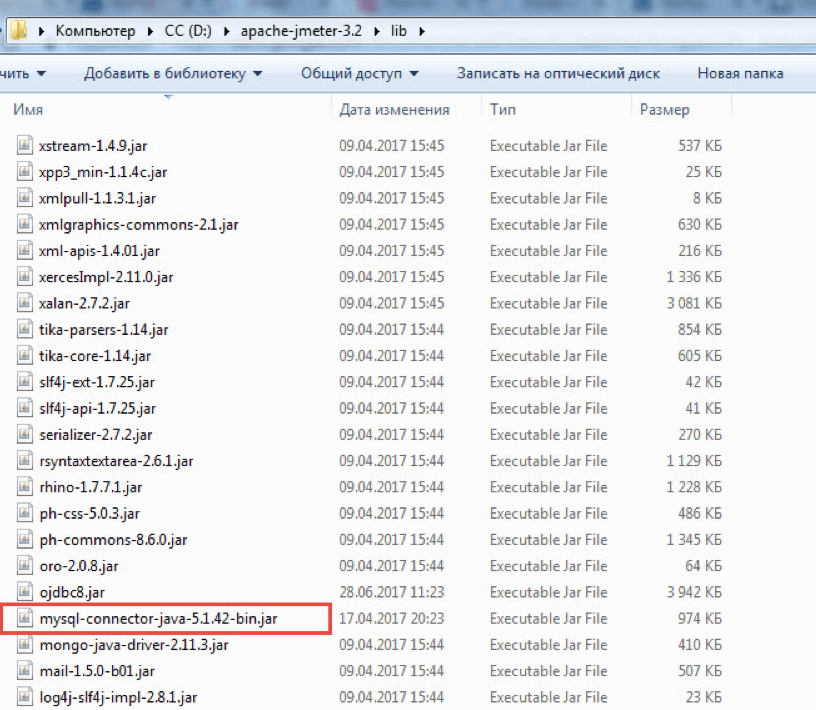
3. Copy the mysql-connector-java-5.1.42-bin.jar to ..\apache-jmeter-3.2\lib folder
Note: the driver Connector/J 5.1.42 is used only for connection to the MySQL database.
Database Connection Configuration
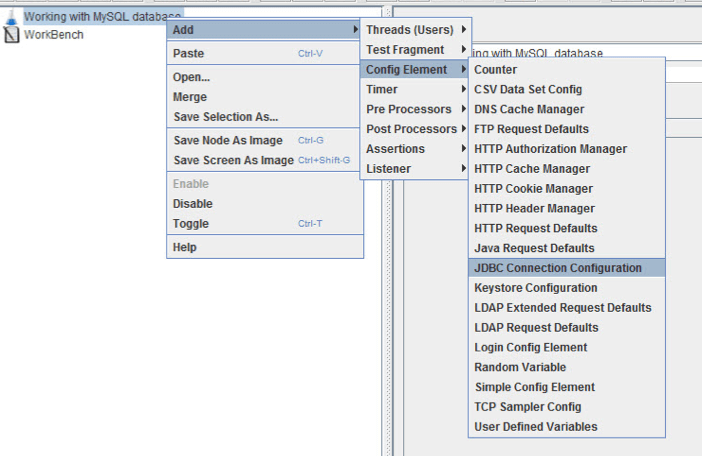
4. Boot JMeter and add the JDBC Connection Configuration element. Right click on Thread Group -> Add -> Config Element -> JDBC Connection Configuration
The JDBC Connection Configuration is used to configure JMeter connections to the database.
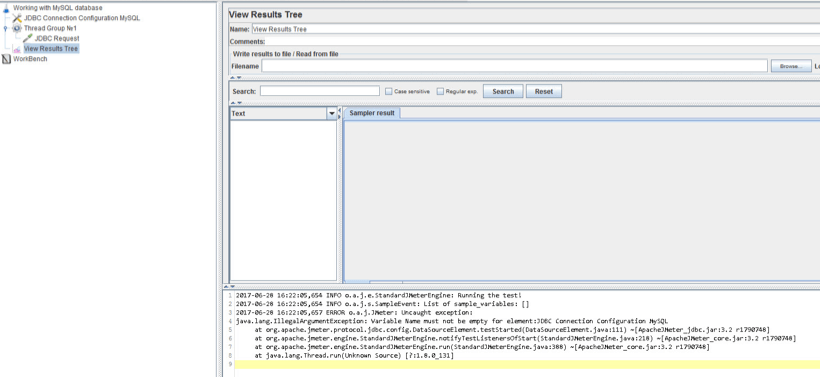
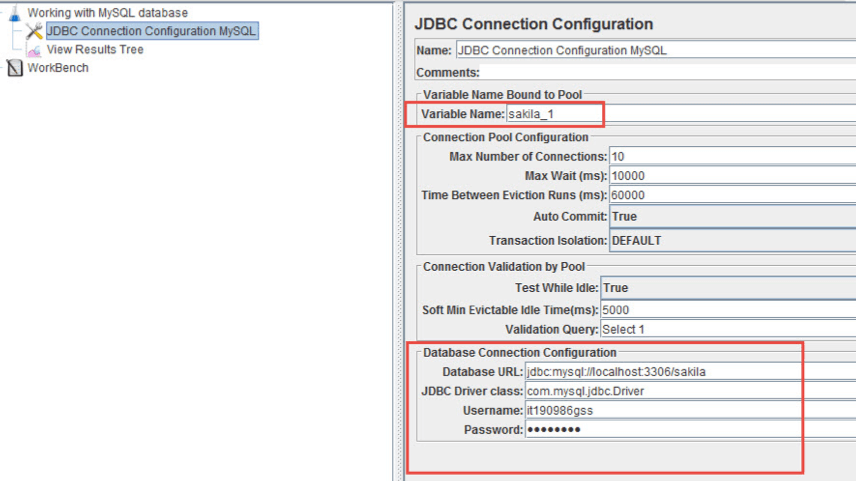
5. Fill in the Variable Name field. The value of this field is used to associate a specific connection configuration (JDBC Connection Configuration) to the database and a specific request (JDBC Request) sent by JMeter.
If the field isn’t filled, the request won’t be sent and the JMeter Console would show the following message: java.lang.IllegalArgumentException: Variable Name must not be empty for element:JDBC Connection Configuration. This can be seen in the screenshot below:
6. Configure the JDBC Connection Configuration. Anyone can use the following configuration by changing the value of localhost and the database schema:
- Datebase URL – used for the database address. Fill in:
- jdbc:mysql:// - the unchanged sequence used in JMeter when specifying the MySQL database address
- localhost:3306/ - the IP address and port that makes the database available. Since in the given example we use a database that is installed on a local PC, we use the IP address and port, configured while installing MySQL. In most cases, it would be necessary to install different connections for databases, which are on the remote server and have, for instance, an IP address and the port 10.56.56.2:4101
- sakila – is a scheme of database (or in a nutshell the name of a definite quantity of tables). Without specifying the scheme, JMeter returns the error: “Response message: java.sql.SQLException: No database selected”
- JDBC driver class – the class in which the code of work with a particular database is implemented (This class was created by the developers of JDBC driver):
- com.mysql.jdbc.Driver – a static series while connecting to MySQL
- Username - the name of a user who has access to the DB
- Password – the password for accessing the DB
The rest of the fields can remain as set by default in JMeter.
Part 2 - Sending a Request to the Database
Sending a Data Request
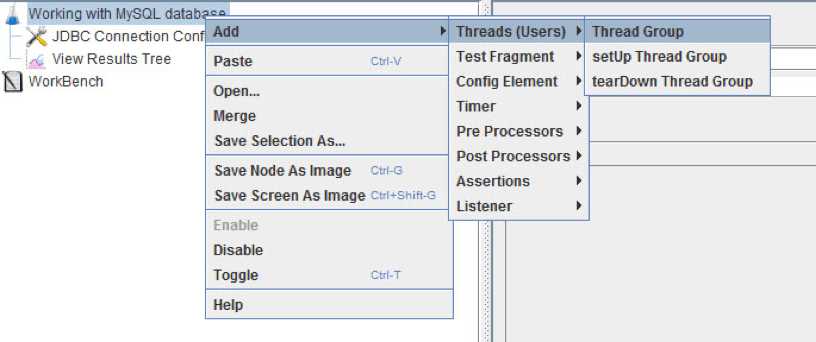
7. Add a Thread Group element
After adding an element, leave all the parameters filled by default (as JMeter itself provides).
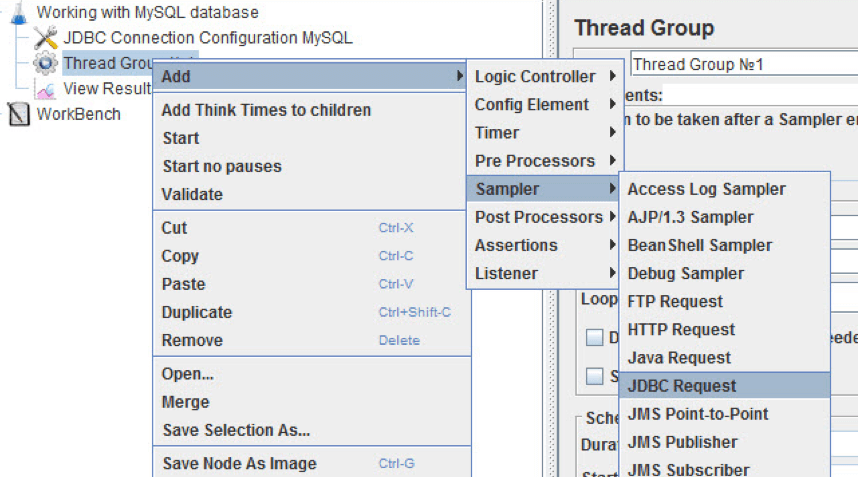
8. Add a JDBC Request as a child element to the Thread Group. The request will allow sending requests to the DB.
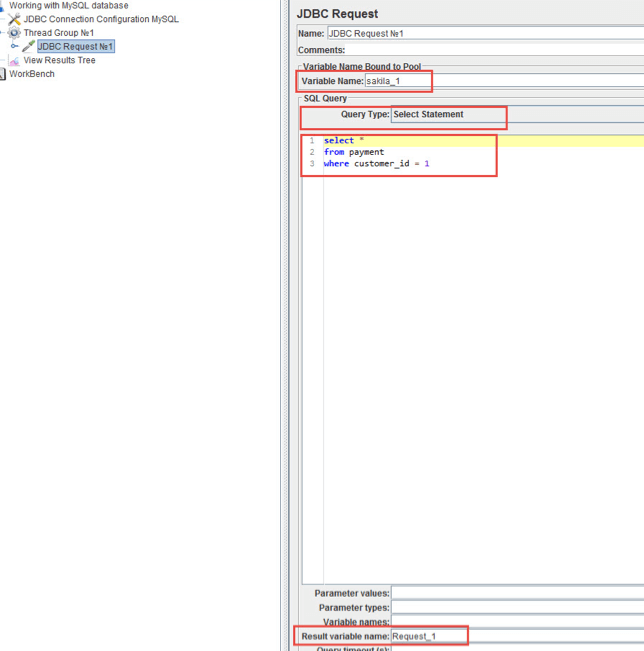
9. Configure the JDBC Request
- Fill in the Variable Name field. I filled in “JDBC Request No. 1” because it is a meaningful name to the request installed by the JDBC Connection Configuration.
- Set the Query Type field to Select Statement. The value of Select Statement indicates that a request will be made to retrieve data from the database
- Set the variable name in the Result variable name field. This variable will store all fields and field values received from the database. The name of this variable must be unique within the Thread Group. If the name of this variable is used in several requests to the database (JDBC Request), then it will store the fields and field values received from the last query.
For example: Let’s say we have two JDBC Requests, which are under the same element of the Thread Group. For JDBC Request №1 and JDBC Request № 2, the value of the Result variable name = A field is set. When JDBC Request №1 returns a response from the database, all fields and field values will be assigned to the A variable. After receiving a response from JDBC Request № 2, all the fields and field values will be assigned again to the A variable, which already contains the values from the JDBC Request № 1. Thus, the data received by JDBC Request № 1 will not be stored in the А variable. The А variable will store the response only from the JDBC Request № 2. In order for the response from JDBC Request №1 and JDBC Request № 2 to be stored in variables and not overwritten, the Result variable name field must be specified as unique (For example, for JDBC Request №1, the value of the Result variable name = A field, and for the JDBC Request № 1 Result variable name = B)
- Create an SQL query against the database in the Query field. In this example: select * from payment where customer_id = 1 limit 10
- The remaining parameters can be left out since further processing of the data will be performed by using Java. (For example, instead of the Response Assertion element, a BeanShell Assertion with the code written will be used, as shown below)
10. Add a View Results Tree Listener and run the test. The item View Results Tree Listener allows you to see the sent requests and received responses as shown in the picture below.
Note: Database requests can be built according to SQL language syntax, which supports a particular database. JMeter does not impose any restrictions on its design.
Asserting the DB Response
In most of the cases when working with a DB, data receiving is complete with respect to the given conditions. If the data corresponding to the request exists in the database, we will get the results.
But what happens when the DB doesn’t have the data we were testing? In such a case, we will get an empty response, but JMeter won’t report it as an error. It will look like this:
To check if the response was correct, we can take the next steps:
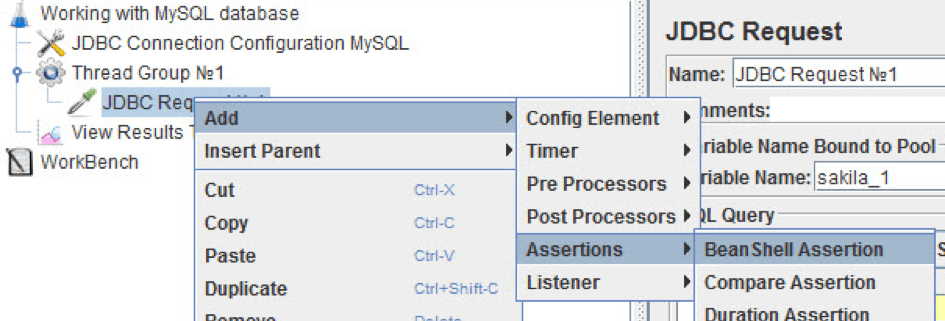
10. Add the BeanShell Assertion element as a child element to the JDBC Request element:
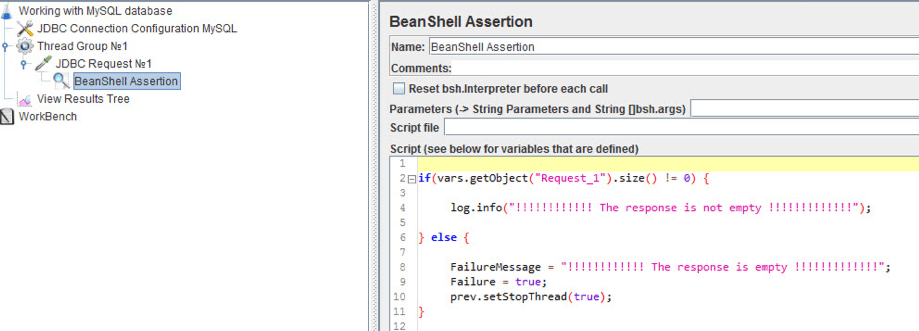
11. Add the code as shown in the picture:
Example:
	if(vars.getObject("Request_1").size() != 0) {
		log.info("!!!!!!!!!!!!!! The response is not empty !!!!!!!!!!!!!!!!!!!");
} else {
		FailureMessage = "!!!!!!!!!!!! The response is empty !!!!!!!!!!!!!";
		Failure = true;
		prev.setStopThread(true);
	}
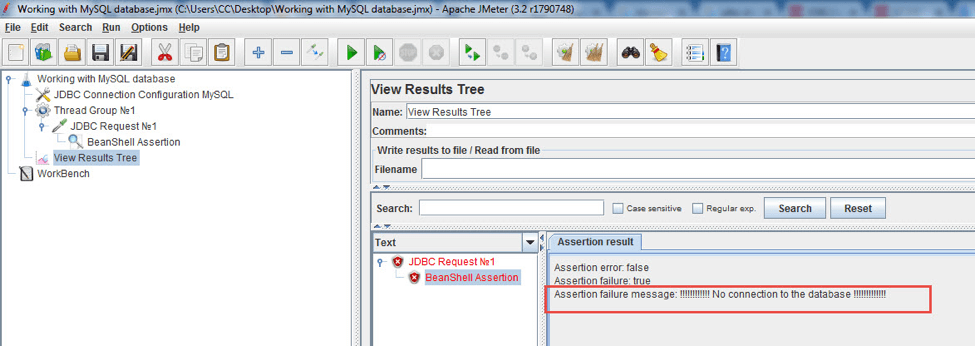
Now, when getting an empty response, all further acts or requests in the Thread Group will be stopped and the correct error message will appear:
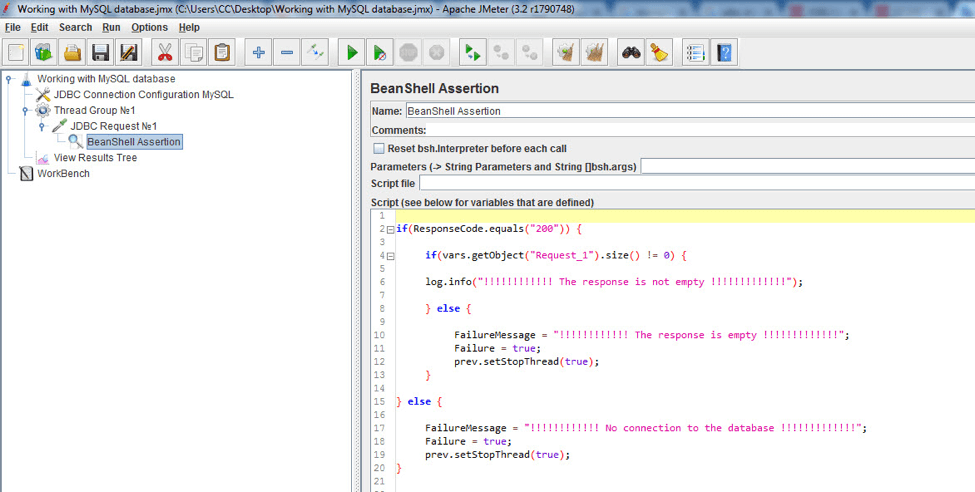
Sometimes there are cases when the connection to the database is temporarily unavailable, the IP address has been changed, or some other reasons have arisen, as a result of which there was no response from the database. As a result, in the above code, errors occur during execution, although there is no error data when there is a connection to the database.
To exclude such moments, you can add a connection test to the database and, in the absence of this connection, correctly display the error message.
Example:
if(ResponseCode.equals("200")) {

if(vars.getObject("Request_1").size() != 0) {
		log.info("!!!!!!!!!!!!!! The response is not empty !!!!!!!!!!!!!!!!!!!");
} else {
		FailureMessage = "!!!!!!!!!!!! The response is empty !!!!!!!!!!!!!";
		Failure = true;
		prev.setStopThread(true);
	}
} else {

	FailureMessage = "!!!!!!!!!!!! No connection to the database !!!!!!!!!!!!!";
	Failure = true;
	prev.setStopThread(true);
}
That’s it! You now know how to create and assert a basic DB configuration with JMeter. Stay tuned for part two, where we will learn how to perform advanced manipulations on variables and on responses, as well as how to perform advanced query types.

