Blog
June 1, 2021
If your performance scripts incorporate advanced logic and your load test needs more complex execution than running a few requests in a row, you need advanced tools. Luckily, Apache JMeter™ provides them as well. One of the most important ones is the JMeter If Controller, or the If condition.
In this article, we are going to show how to use JMeter’s If Controller.
What is the JMeter If Controller?
Back to topThe JMeter If Controller allows you to determine whether or not to run a batch of child samplers, according to certain conditions. While the main idea is pretty simple, there are many questions and issues around this controller.
How to Configure the JMeter If Controller
 Back to top
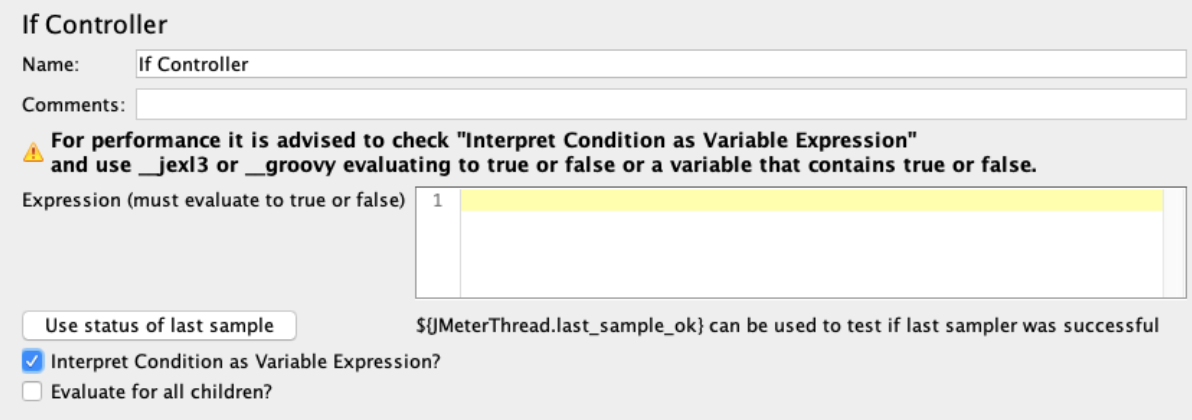
JMeter If Controller Parameters
- Name - the controller that is used to identify an element in the JMeter elements tree
- Comments - the field that you can use to include a descriptive explanation of a specified condition (sometimes a condition might be very complicated and it’s useful to leave such comments as a reference)
- Expression (must evaluate to true or false) - a condition that is verified by the execution flow to decide if children elements should be executed or not. By default, the condition is interpreted as a Javascript code that returns “true” or “false”
- Interpret Condition as Variable Expression? - this parameter is designed for cases when you don’t need to evaluate Javascript code. The default method takes and interprets a specified condition as Javascript code, and after that it verifies if the result equals true or false. But if you select this parameter, then no Javascript interpretation will be used and the condition will be treated like a JMeter variable (don’t worry, we will cover this thoroughly in one of the examples further on)
- Evaluate for all children? - if this property is selected then the specified condition will be checked for each child entry and not only once, as it is done by default
Now that we know the JMeter If Controller better, let’s go through some tips.
Back to topStart testing JMeter IF Controller with BlazeMeter for free today!
6 Tips For Using the JMeter If Controller
Tip #1 - Control the Test Script Execution Flow
The main purpose of the If Controller is to control the JMeter execution script flow. This basically means that you can run samplers only if a certain condition is true. Let’s assume that we have a basic script with two request samplers: the first request sampler is located one step before the If Controller, while the second sampler is located inside it. Let’s add the simplest condition in order to verify that the execution workflow works as expected:

Keep in mind that the JMeter If Controller uses Javascript for condition interpretation. Let’s run our script:

As you can see, both requests were triggered because our If Controller condition (1==1) was returned as true. Let’s try to make it false and verify script execution again:


This time request which is located inside If Controller was not executed as expected because of our new condition (1==2), which obviously returned as false.
This is the simplest example of how the If Controller allows you to have control over the scripts execution flow. To prevent a certain part of the script from being executed, nest it under the If Controller and set the condition as false.
Tip #2 - Check Your Condition Syntax Attentively
When creating conditions, you should verify their syntax, because it’s very easy to make mistakes that are not so easy to catch. Let’s create a user defined variable that we can use further in our test conditions:

Now we should have the ${RESULT} variable that returns the ‘COMPLETED’ string. Let’s create a simple comparison of the created variable with the expected value:

We know that the ${RESULT} variable should contain the ‘COMPLETED’ string and we might expect that the created thread group will run both of our requests. Let’s check this out:

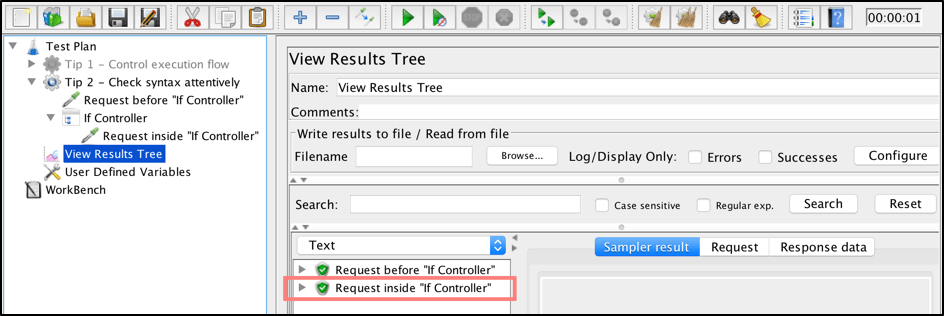
As you see, the second request was not executed this time. We don’t have errors, and the script is running successfully, so what’s wrong? As you can guess, we have the wrong condition syntax. This is one of the most common mistakes with the JMeter If Controller. If you want to compare two strings, you have to specify both of them in quotes (quotes should be used even for variables). Let’s try to fix that and run the script again:


That’s why it’s important to check your condition syntax attentively to prevent unexpected script behavior.
Tip #3 - Use ‘Interpret Condition as Variable Expression’ Where Possible
When running a performance script that simulates a large number of users, you should keep in mind how many resources you are using for the test. When using the JMeter If Controller, remember that by default the If Controller interprets conditions with Javascript, and each interpretation takes up resources.
Therefore, if you can use ‘Interpret Condition as Variable Expression’ instead of the default Javascript interpretation - use it! Let’s create one more defined variable with a boolean ‘true’ value:

And now let’s use that variable in a basic condition and run our script:


Everything works as expected. But let’s be wise and refactor the ‘If Controller’ to use ‘Interpret Condition as Variable Expression’:


The script result is the same and everything is working fine. But this time we know that the specified condition doesn’t require Javascript interpretation and it saves performance resources.
Tip #4 - Use Groovy and JEXL Interpreters Instead of Javascript
If you have a complicated condition that can not be executed by using the variable expression interpreter, it’s better to use Groovy and JEXL interpreters. They are also advised for performances by JMeter’s documentation.
To use the Groovy or JEXL interpreters, you need to use the __jexl3 or __groovy function appropriately. Look at this example that gives you an idea how to use it properly:

Tip #5 - Use the ${JMeterThread.last_sample_ok} to Check Transactional Requests
In some cases, you might want to verify a list of requests as one transaction. A transaction is an operation that must succeed or fail as a complete unit, and it never can be partially complete. In our script, we might want to run a batch of requests until one of them fails. In this case, we would not want the remaining requests to run.
While JMeter doesn’t provide a special controller to perform such a workflow, you can use the If Controller with the ${JMeterThread.last_sample_ok} function, which checks if the previous request was successful. We can get this done in a few steps. Let’s create 5 requests and make one of them invalid:

Let’s assume that we want to run all requests until some of them fail. For that you can add the If Controller as a parent element for these requests and apply this configuration:

As we mentioned before, ${JMeterThread.last_sample_ok} function returns the result of the previous request sampler, while the ‘Evaluate for all children?’ parameter tells JMeter to verify the condition against each child request samplers.
Therefore, if the previous request is successful, then ${JMeterThread.last_sample_ok} returns ‘true’ for the next request and it will run. Otherwise, ${JMeterThread.last_sample_ok} returns false and all remaining requests will not be run.
Tip #6 - Use CLI to Test Your Conditions
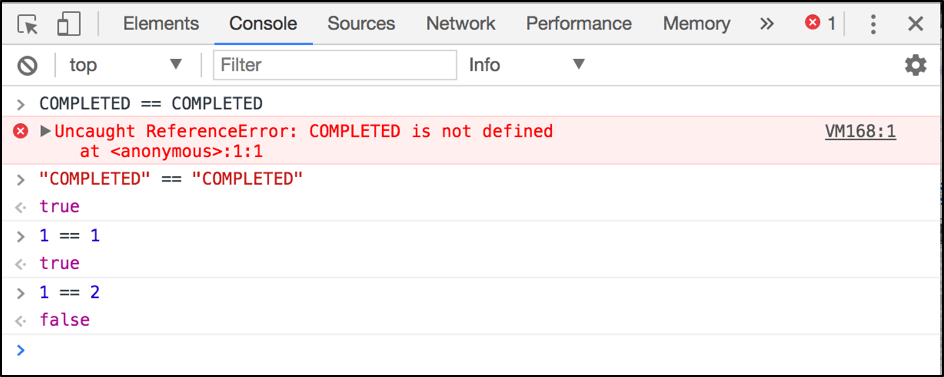
The best way to verify your If Controller condition is to test it using a Command Line Interface (CLI). CLIs are tools that can be used for syntax validation.
Google Chrome provides a great out-of-the-box ‘Developer Tools’ extension, which already has a Javascript console that can be used for syntax checks. To access this console just open your Google Chrome browser and go to “Options -> More Tools -> Developer Tools -> Console”.

The same principles can be applied to Groovy and JEXL interpreters. Just use proper tools to validate your conditions before using them in your tests.
That’s it! Now you know how to use JMeter ‘If Controller’ and you can try to apply all these tips in action! Let us know what you think in the comments section, and if you have some additional interesting examples in mind.
Related Resources:
