Blog
February 3, 2020
RTMPT testing is important, especially for streaming data. In this blog, we break down everything you need to know.
Table of Contents
What is RTMPT?
Back to topRTMPT (Real Time Messaging Protocol Tunneled) consists of RTMP based messages that are encapsulated within the HTTP. The RTMP protocol works over the TCP protocol. This means that RTMP operates on the transport level, while RTMPT is the application level protocol.
Why Test RTMPT?
Real-time traffic as streaming data is becoming a major part of internet traffic these days. The amount of streaming data traffic is growing every day, as existing providers offer new services to their clients, new media streaming providers and services appear and new business operations related to these services, turn up.
Streaming media is more than the broadcasting of TV, video or audio programs over the internet. In fact, streaming applications can also be found in business areas, like security systems, companies that provide training services over the internet, webinars and videoconferencing systems, and corporate business systems. All of these generate a lot of streaming data over the internet.
For any streaming application, seamless streaming must be ensured for maximum performance. This is why it’s very important to load test website services that deliver media content before launching them, as well as incorporating continuous testing. It’s crucial to ensure the content received by customers meets customer expectations, as well as to verify that the tested service meets throughput and performance requirements.
Media content can be streamed to clients over a few different protocols. Some of the streaming protocols work over the HTTP protocol, while others stream over TCP or UDP transport protocols.
Back to topConsiderations for RTMPT Testing
There are different approaches and different tools to test streaming services. While load testing of streaming media can be accomplished with JMeter, there are no built-in samplers that can establish connection over either the RTMP or RTMPT protocols. Therefore, if you want to implement a script that streams media data over these protocols in JMeter, it’s necessary to use other approaches, as I will detail.
The RTMPT protocol defines four types of commands sent from the client to the streaming server, for establishing a connection and for receiving contents. These four type of commands are ‘ident’, ‘open’, ‘send’, ‘idle’. Each command is a POST HTTP request that is sent from client to server, and each command uses a different URI (path) in the HTTP request. As mentioned above, in the RTMPT protocol RTMP messages are encapsulated in the HTTP request body. These messages represent either control strings that are sent from the client to the server, or streaming data and responses to the client commands that are sent from the server to client.
The entire flow can be split into four phases:
- Handshaking - the connection is established
- Communication parameters negotiation - the client and the server agree about the delivered contents, and the media contents start being delivered to the client
- Receiving streamed data - the client sends requests and the servers sends back the next portion of data
- Closing active connection
Back to top
How to Test RTMPT
Now we’ll look into each phase in detail and show how they can be implemented in the JMeter script. You can use this file to practice yourself.
Step 1: Handshaking
According to the RTMPT protocol specification, all the HTTP requests the client sends to the server have to have a Content-Type header with the value application/x-fcs.
In JMeter, add a HTTP header manager config element to the script and a Content-Type header with the value application/x-fcs to it.
Parameters
All HTTP Requests between the client and the server need to have the same parameters.
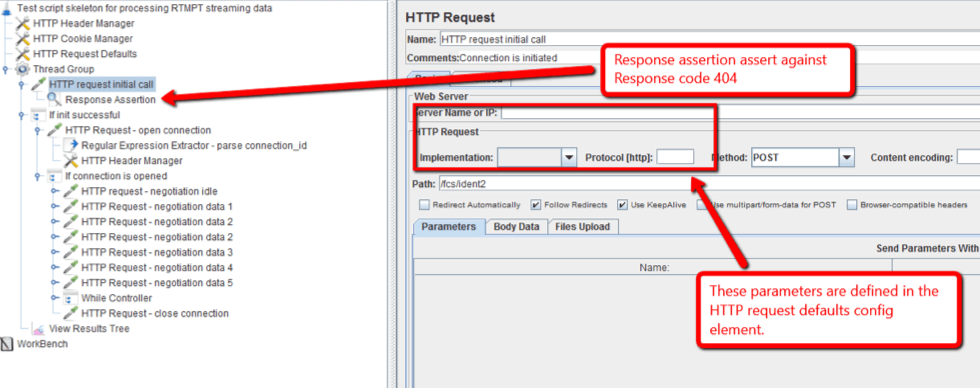
In JMeter, add a HTTP Request Defaults config element to the script and define parameters. These parameters should be the same for all HTTP requests: server name, implementation and protocol type.
HTTP Request
The client sends a POST HTTP request to URI /fcs/ident2, with the Content-Type header application/x-fcs. The server responds with the response code, depending on its settings for this type of request. On default it responds with the response code 404 and the message “Not found”.
In JMeter, add a Thread Group and a HTTP Request under it. Add the /fcs/ident2 string to the path field of the HTTP sampler.
Response Assertion
For simplicity, consider the server responds to this request with the response code 404.
In JMeter, add a Response Assertion element to the script, as a child element of the HTTP sampler, to assert the 404 Response Code. Don’t forget to set the ‘Ignore status’ checkbox inside the assertion. Now add the ’If Controller’ to the script. Evaluate the last sampler result variable in the condition string.
HTTP Sampler
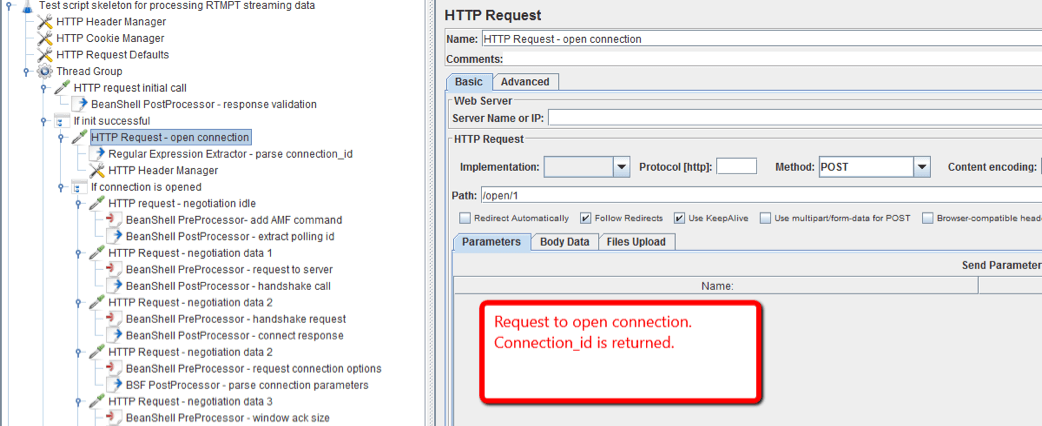
After the first request, the client sends a POST HTTP request to the server to open the connection. The request URI is /open/1.
In JMeter, add a HTTP sampler and add /open/1 string to the path field of the sampler.
Regexp PostProcessor
The server responds to the client with a RTMPT connection ID in the body of the response, which is further used for handling requests.
In JMeter, add the child Regexp PostProcessor component to the sampler. This will extract the connection ID from the response and save it in the JMeter variable.
Add the ‘If logic’ controller in the script to validate that the connection_id variable is set and if it executes the further steps of the flow.
Step 2: Communication Parameters Negotiation
With a series of ‘send’ commands, the client negotiates streamed data communication parameters with the server. These include: the endpoint of media contents, bandwidth, chunk size, buffer size and other parameters.
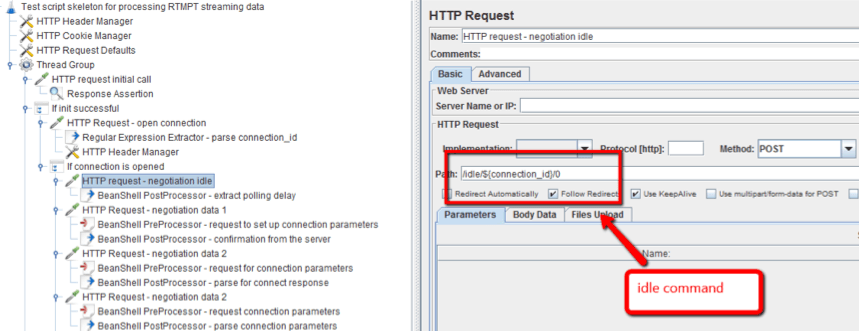
The series starts from the HTTP request to URI /idle/connection_id/0 and continues with several HTTP requests that are transmitted to URI /send/connection_id/number. Connection_id is the id received from the server at the negotiation phase and its numbers are 1, 2, 3, 4 or 5, depending on the type of the ‘send’ command. ‘Send’ commands are sent in a sequence, starting from /send/connection_id/1 and ending with /send/connection_id/5.
In JMeter, add a HTTP sampler for the ‘idle’ command.
HTTP Request For Send Commands
In case of success, the server responds with the response code 200. Then, five idle send commands follow.
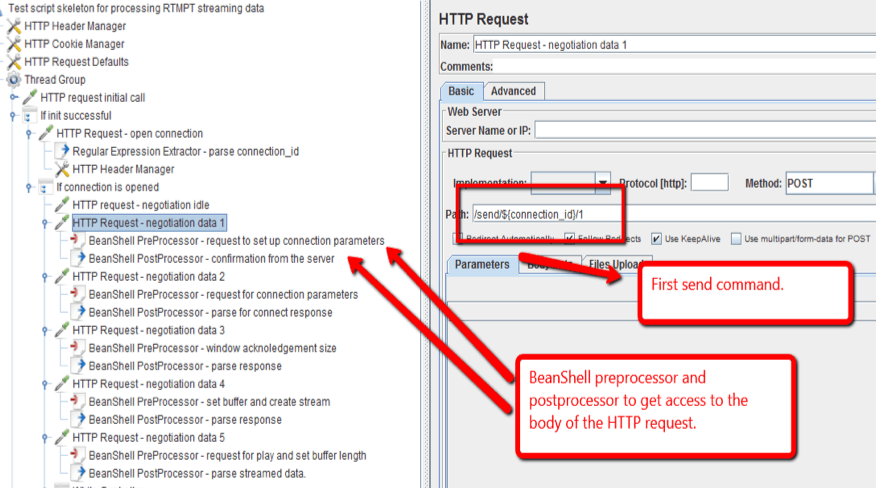
In the body of the HTTP request for ‘send’ commands, the client sends the AMF encoded control blocks that controls negotiations: they pass requested data from the client to the server and return negotiated data from the server. Connection parameters are specified in the RTMP protocol specification and depend on the configuration of the streaming server. We will add all these five ‘send’ commands added to the JMeter script. The first ‘send’ command initiates negotiation between the client and the server.
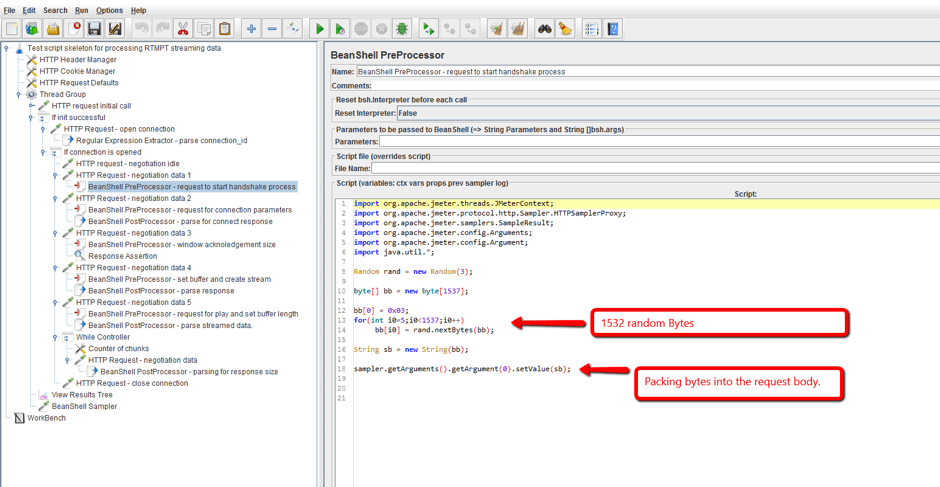
According to the official documentation, the RTMP connection is established through the exchange of three packets both from the client and the server sides. Each packet is encapsulated in one HTTP request. The body of the first ‘send’ command contains 1537 bytes of data. The first byte is set to 0x03, then following four bytes represent the ‘epoch’ timestamp, but RTMP specification admits setting them to ‘0’. The other bytes are random numbers and they may be set to ‘0’ as well.
In JMeter, to make such HTTP request, add a HTTP sampler to the script, as shown on the screenshot below:
BeanShell Preprocessor
To form the 1537 bytes of the body of the HTTP request, add a BeanShell preprocessor as a child element of the HTTP sampler, which represents the first ‘send’ command. The BeanShell preprocessor should implement generation of this byte array and attach this array to the HTTP sampler body.
HTTP Samper to JMeter Script
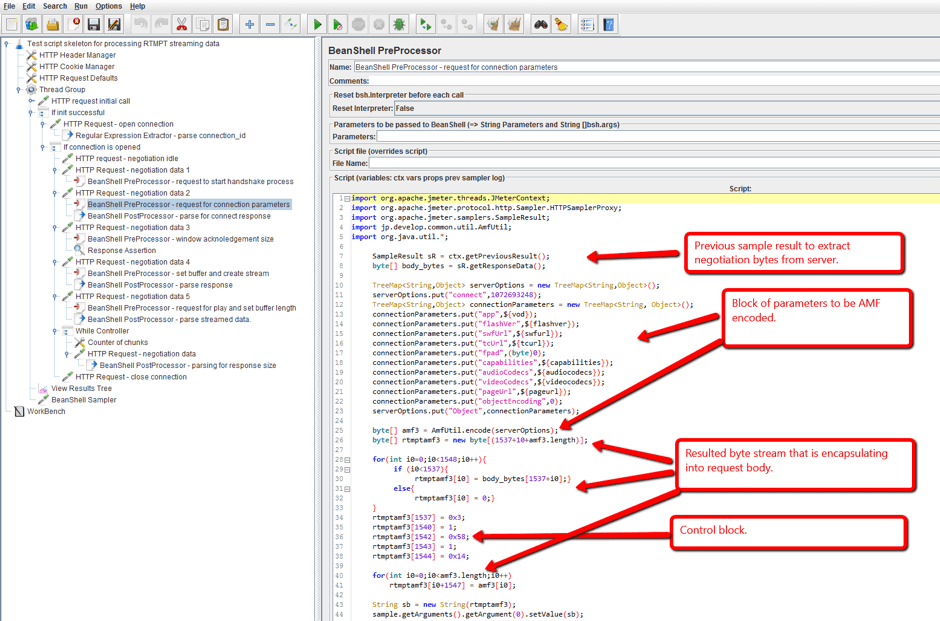
The server responds with a block of bytes to the first ‘send’ command. It’s necessary to save it and send it to server in the following ‘send’ command. Extracting and adding the 1537 bytes of the server response is done in the preprocessor of the next HTTP sampler. The next ‘send’ command returns the response of the previous sampler back to the server and requests the connection.
In JMeter, add a HTTP sampler to the JMeter script. The sampler is similar to the previous one, except for the path, which is /send//2. The body of this sampler is composed from the stored response of the previous request and the AMF coded block.
Now we need to add a BeanShell preprocessor child element to this HTTP sampler. The implementation of the BeanShell preprocessor should attach bytes saved from the previous sampler response and AMF coded block, to the sampler body. For AMF coding the third party library is used. Download the amf48 jar file and drop it to the jmeter /lib/ext directory. The PreProcessor for this sample is shown on the screenshot below:
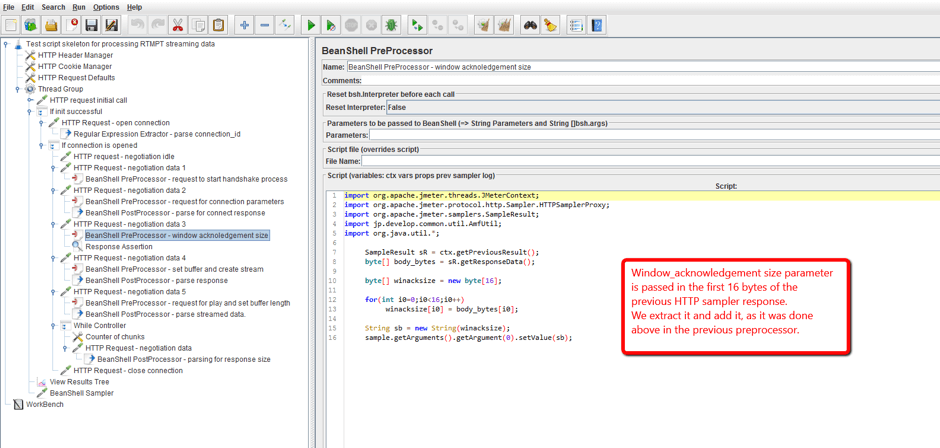
The server responds with the AMF coded communication data. From the response, we extract only the window acknowledgement size parameter.
The next HTTP request is a send command, that passes the window acknowledgement size parameter to the server in the AMF coded form.
HTTP Sampler For Send Command
In JMeter, add a HTTP sampler for this ‘send’ command, as done for the previous ones, and set the sampler path field to /send/connection_id/3. The BeanShell preprocessor for this sampler is shown on the screenshot below:
The expected response code from the server for this HTTP request is ‘200’.
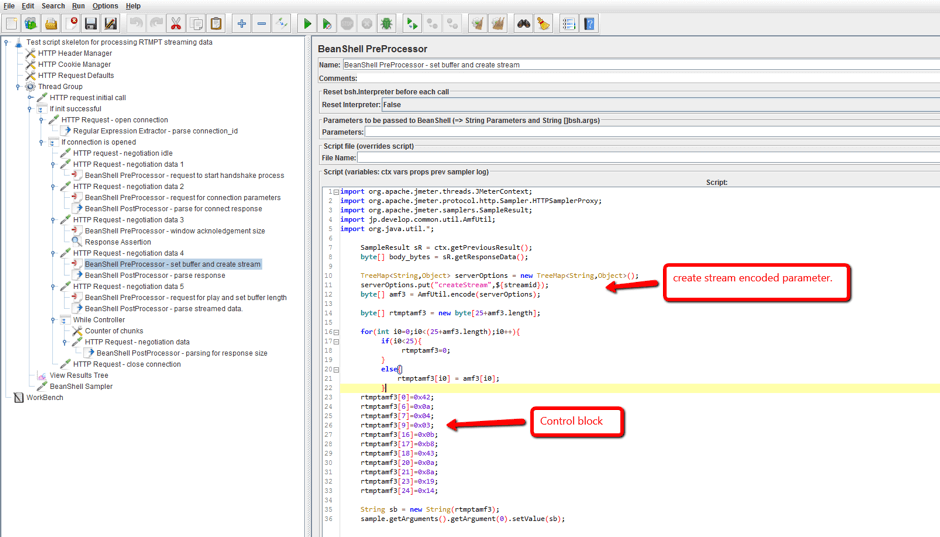
The next ‘send’ command, which the client sends to the server, sets buffer length and creates the stream. The create stream parameter is AMF encoded.
In JMeter, add a HTTP sampler for this request to the JMeter script and set the path field of the sampler to the /send//4.
BeanShell PreProcessor
Add a BeanShell PreProcessor as a child element for this sampler. The contents of the preprocessor are shown in the screenshot below.
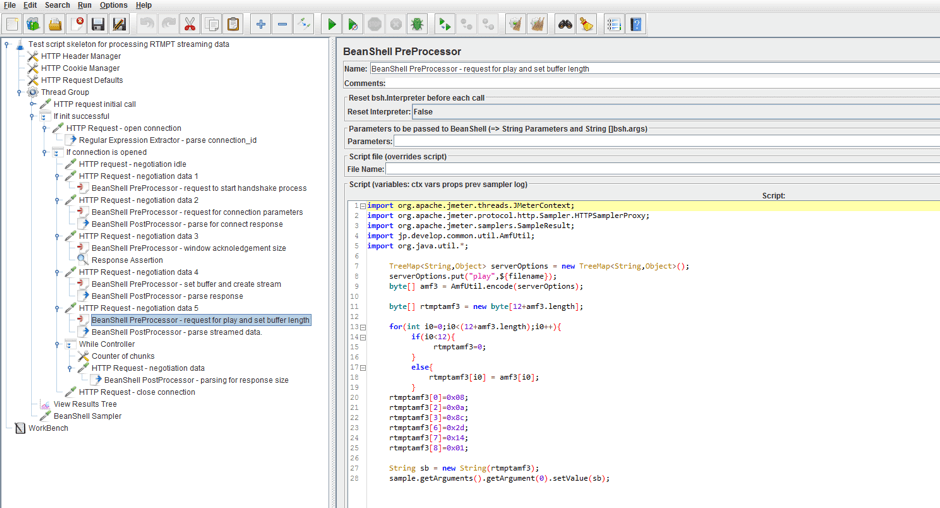
If the stream is created, the HTTP response code is 200 and in the body of the HTTP response, the connection result code is returned. In the last ‘send’ command, the media is requested and the server returns the first blocks of streamed data. The body of this request contains the AMF coded file name and buffer length. In order to implement it, add the BeanShell preprocessor component as a child to this sampler. The server responds with the metadata and streaming data in the body of the response.
In JMeter, add a HTTP sampler for this command and set the HTTP sampler path to /send//5.
Add a BeanShell PreProcessor as a child element to pass the AMF encoded file name and buffer length parameters to the body of the HTTP request.
Step 3: Receiving Streamed Data
From this moment on, the client parses the response of the HTTP request, extracts the chunked stream, restores the streamed media and saves the data to file. Each time the next portion of data is restored, the client sends an ‘idle’ command to the server. This command is the HTTP post request that is sent to the URI /idle/connection_id/number URI. Here the number sequentially changes when each new ‘idle’ command is issued to the server, starting from 6.
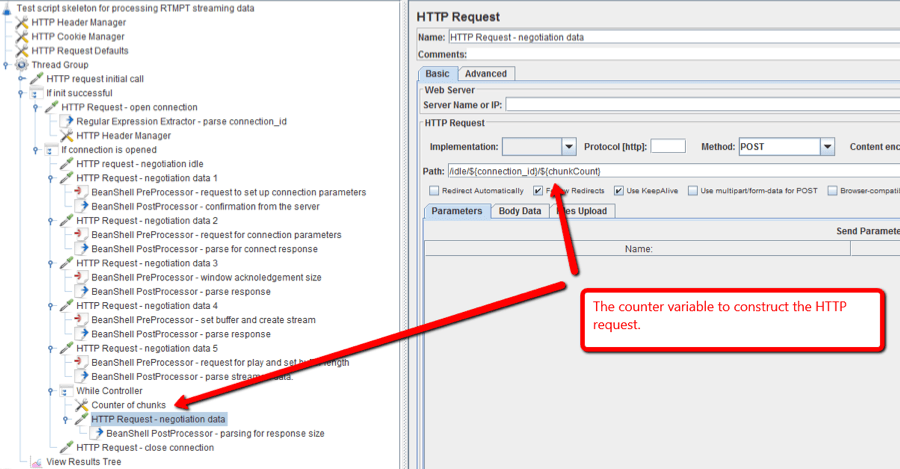
While Controller
The streamed data is returned in the body of the response. To implement this part of the script in JMeter, add a While Controller and HTTP sampler under the While Controller.
In JMeter, add a counter under the While Controller to count from 6.
Add a BeanShell PostProcessor element as a child element of this sampler and implement it to check that the body of the HTTP sampler contains data. The empty response (when it contains no data) is the condition required to leave the loop cycle of the While Controller. This structure is shown in the screenshot below.
To simplify the task, there is no need to add BeanShell PostProcessor elements to reconstruct the stream on the JMeter side. The purpose of load testing in this case is to load the streaming server with requests from the clients imitated by the JMeter script, to which the server responds with the requested media streams.
Step 4: Close Active Connection
At the end of the communication, the client sends a close command to close the active connection. The command is sent as HTTP Post Request to the URI /close. The server responds with the 0x00 byte and closes the stream.
In JMeter, add the HTTP Sampler to the JMeter script and add the string /close to the path field.
Congratulations! This isn’t a simple solution since it requires a lot of coding work, especially to compose AFM commands that the client sends to the server and to parse parameters that server returns to the client. But you got through it!
This example is one of the implementations of the JMeter script for load testing streaming web services that streams data over RTMPT protocol. An alternative option is to develop your own samplers, which implement RTMPT flow for working with streaming data.
You are welcome to ask questions in the comments section below. Click here to request a BlazeMeter demo (for the big game or any other need) and to learn more about using BlazeMeter for complex load testing scenarios.
This blog was originally published on February 2, 2017 and has since been updated for accuracy and relevance.


